Blisters and chafing are almost unavoidable on longer backpacking trips. Even with properly fitted boots, hiking socks, and a well-adjusted backpack, repeated friction over many kilometres can still create hot spots, blisters, or skin irritation.
In our experience, the method below does not necessarily stop every blister from forming, but it reduces the pain to almost zero while we are hiking. It has become a standard part of our backpacking first aid routine.

Our Blister and Chafing System
We use the same basic method to treat existing blisters and to protect areas that are likely to develop friction before the hike starts.
Clean
Clean the area with rubbing alcohol when the skin is intact.
Lubricate
Apply a thin layer of petroleum jelly to reduce friction.
Cover
Cover the area with a non-stick bandage or blister pad.
Secure
Apply K-Tape over the bandage so it stays in place while hiking.
If a blister or chafing develops
- Clean the affected area with rubbing alcohol if the skin is intact.
- Apply a thin layer of petroleum jelly.
- Cover the area with a sterile non-stick bandage or blister pad.
- Apply kinesiology tape, also called K-Tape, over the bandage to hold everything securely in place and reduce friction.
The K-Tape helps keep the dressing from moving inside the boot or under the backpack hip belt. For us, that is the part that makes the biggest difference during long hiking days.
At the end of each hiking day, we always replace the dressing with a fresh one. Sometimes we also apply a thin layer of Polysporin to the affected area before reapplying petroleum jelly, a non-stick bandage, and K-Tape for the next day's hike.
How We Use It for Prevention
For areas that commonly develop friction, we use exactly the same method before starting the hike. Applying protection before friction starts has worked much better for us than waiting until the area becomes painful.
We usually apply it to:
- Toes that have rubbed on previous hikes
- Heels
- Hips where the backpack hip belt contacts the body
- Any area that has developed hot spots during previous trips
The same method works well for areas where backpack hip belts repeatedly rub against the skin. Applying protection before the hike helps reduce friction throughout the day.
Keep Blister Supplies Accessible
Store blister supplies in an external backpack pocket or another easily accessible location. If you notice a hot spot or the first signs of chafing, stop and protect the area immediately. Treating the problem early helps reduce additional friction and discomfort for the rest of the hike.
Do not bury blister supplies deep inside the main compartment of your backpack. If it takes too long to reach them, it is easy to keep hiking and make the problem worse.
Choose the Right Hiking Socks
One thing that made a noticeable difference for us was switching to socks designed specifically for hiking.
It might seem like thicker socks would provide more protection, but that has not been our experience. Socks that are too thick can create additional pressure inside hiking boots, increasing friction instead of reducing it.
Look for socks that are recommended for hiking. They provide cushioning where it is needed while still allowing your feet to breathe and fit properly inside your boots. We usually buy Smartwool or Darn Tough hiking socks for backpacking trips.
Our Backpacking First Aid Kit
This is the first aid kit checklist we currently use for backpacking trips. The exact contents should match your destination, trip length, group size, and personal medical needs.
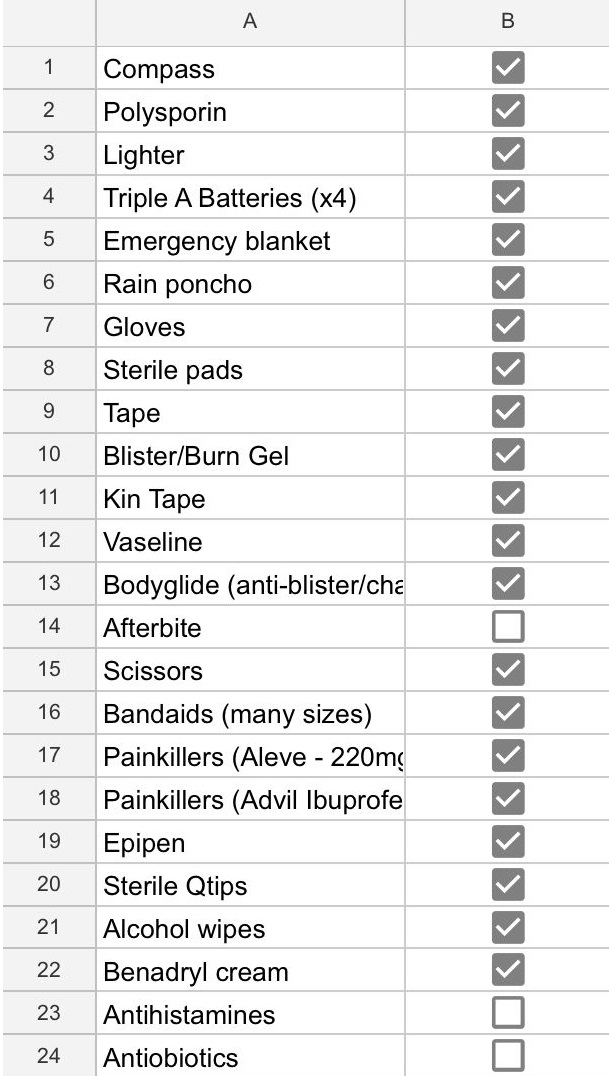
- Kinesiology tape, also called K-Tape
- Petroleum jelly
- Non-stick bandages or blister pads
- Alcohol wipes or rubbing alcohol
- Polysporin
- Medical tape
- Small scissors
- Blister and burn gel
- Bandages in multiple sizes
- Sterile pads
- Disposable gloves
- Pain relievers
- Antihistamines
- Any prescription medications required by your group
Products We Use
These are the types of supplies we currently carry. Similar products from other brands can also work.
- Kinesiology Tape (K-Tape)
- Non-stick bandages
- Petroleum jelly
- Polysporin
- Compact first aid kit
- Smartwool or Darn Tough hiking socks
Our Experience
I used to get a lot of chafing on my hips from the backpack hip belt, especially on longer backpacking days. We also use this method on toes during multi-day trips.
On several occasions, we discovered surprisingly large blisters after finishing the day's hike. Even with large toe blisters, we did not suffer while hiking because the dressing stayed in place and the K-Tape prevented additional friction.
Everyone's skin is different, but this system has become one of the most useful parts of our backpacking first aid kit.
Common Mistakes
- Waiting until camp before treating a hot spot.
- Wearing socks that are too thick inside hiking boots.
- Starting a multi-day backpacking trip with new boots that have not been tested.
- Keeping blister supplies buried inside the backpack.
- Not replacing dressings at camp before the next hiking day.
Related TrailReady Guides
These TrailReady guides can help with other parts of backpacking preparation:
- How to Choose a Sleeping Bag for Backpacking
- How to Store a Backpacking Water Filter Between Seasons
- Bear Safety for Backpacking in Canada
- How TrailReady Gear Recommendations Are Made
FAQ
Should I apply K-Tape before I get a blister?
In our experience, yes. We usually apply it before hiking to areas that are most likely to develop friction, especially toes, heels, and hips.
Does this method prevent blisters completely?
Not always. On long backpacking trips, blisters can still develop. For us, the biggest benefit is that this method reduces friction and makes the pain almost disappear while hiking.
Can I use this method for backpack hip belt chafing?
The same method works well for areas where backpack hip belts repeatedly rub against the skin. Applying protection before the hike helps reduce friction throughout the day.
Why do you put K-Tape over the bandage?
The K-Tape helps hold the bandage securely in place and reduces movement and friction while walking.
Should hiking socks be very thick?
Not necessarily. In our experience, socks that are too thick can increase pressure and friction inside hiking boots. We prefer socks that are specifically made for hiking, usually Smartwool or Darn Tough.
Where should blister supplies be stored?
Blister supplies should be stored in an external backpack pocket or another place that is easy to reach without unpacking the backpack.
How TrailReady Helps
TrailReady helps backpackers plan gear based on destination, weather, trip length, and expected conditions. Small items like blister supplies, K-Tape, and proper hiking socks can make a large difference on multi-day trips.
Use TrailReady to plan your next backpacking trip and build a gear list based on your route, season, trip length, and expected conditions.
References
This article describes our personal backpacking experience and is not medical advice. If a blister becomes severely painful, shows signs of infection, or you have concerns about wound healing, seek advice from a qualified healthcare professional.
Plan your next backpacking trip with TrailReady.